Part 3: Creating a Palletizing Setup
Setups contain information about robot environments, box place patterns, and trajectories.
To create a setup, head to the “Setup” page of the web application by clicking on its icon in the left sidebar menu. The URL of the page is [YOUR-IP-ADDRESS]:8080/setup.
Existing setups will appear here. To create a new one, click on “Create a New Setup”.
1. Project Subpage
In the Project subpage, upload the .jacobi-project file you created in Part 1: Configuring a Cell in Studio. The file must not exceed 20 MB.
2. Box Subpage
In the Box subpage, enter the dimensions of the box to be palletized. All boxes in the pallet(s) must be of the same size and type. The example project in this manual utilizes boxes with dimensions 9 inches (width) x 7 inches (length) x 6 inches (height).
The Box subpage also allows you to enable Labels and Double Pick.
Enabling Labels ensures that the boxes are oriented so that their labels face in a specified direction. The arrow indicates the face where the box label should be.
Double Pick allows the palletizer to pick and place two boxes simultaneously.
Tip
At the bottom of the Box subpage, there is a Studio visualization showing the box on the conveyor at the pick point, which is located at the bottom-right corner of the box. You can click and drag the view in this visualization just like in Studio, helping you better visualize the box and its position on the conveyor.
3. Pattern Subpage
The Pattern subpage allows you to define how boxes should be placed on the pallet. It provides several features and tools to customize the box arrangement.
In the Advanced Menu at the top of the page, you can specify the default gap between boxes and set different gaps for the X and Y directions if needed.
The layer configuration section lets you view and edit the boxes of each layer. You can add new boxes, remove all boxes, or add a predefined box grid. It also allows you to add and remove individual box labels. Hover over the “UI Shortcuts” tooltip at the top of the page and familiarize yourself with these shortcuts for a faster workflow.
Note
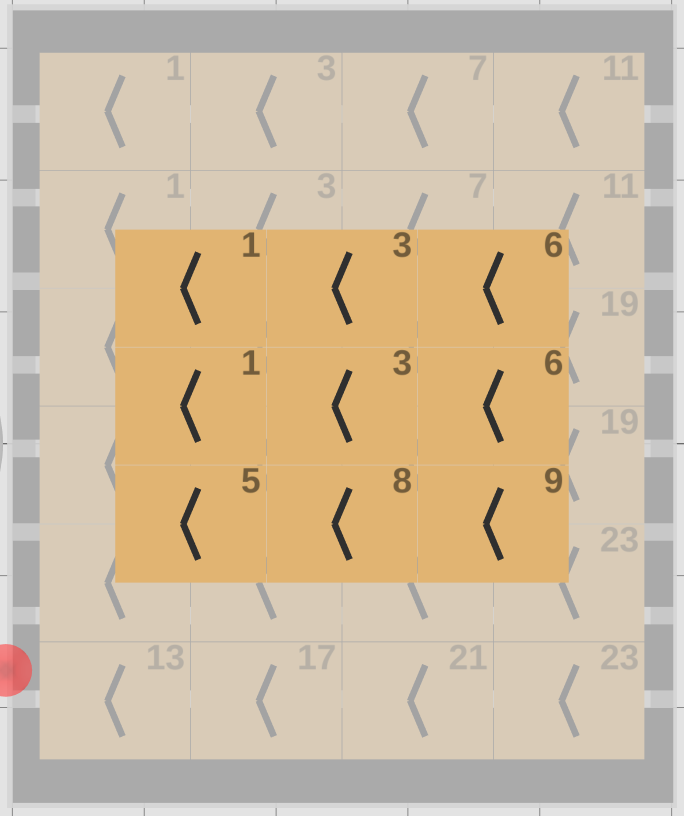
Each box contains a number at the top-right corner indicating the order in which the box will be placed on the pallet.
Note
The axes at the base of the robot indicate the positive x (red) and positive y (green) directions in the world coordinate system. Knowing the positive x and y directions is crucial for accurately setting motion parameters (detailed below) such as pick/place x and y offsets.
Refer to the following GIFs to learn about different actions you can take to configure the box pattern.
Manipulating an individual box’s location and orientation using the gizmo:
Adding a box grid (the number of rows and columns default to the maximum amount of boxes that fit on the pallet):

Manipulating several boxes at once by using click and drag:

Toggling the “Snap to Boxes” option to automatically align boxes to a grid:
Temporarily disabling snapping for more precise movements (this can also be done by holding Shift):
In the “Box Placing Order” section for each layer, you can choose the sequence in which boxes are placed. Options include starting with the box furthest from the conveyor but closest to the robot, or starting with the box closest to both the conveyor and the robot.
Tip
To choose the optimal box placing order, consider the cell layout and the robot’s palletizing paths. Starting in dense corners can add unnecessary complexity to motion planning as boxes accumulate. It’s best to begin in less crowded corners or corners that the robot doesn’t traverse while palletizing.
In the example in this guide, the robot starts palletizing at the box furthest from the conveyor but closest to the robot. This prevents boxes from becoming obstacles in subsequent paths, unlike starting at one of the lower corners.
Adding Layers
You can add multiple layers by clicking “Add Layer.” To streamline the process, you can configure the new layer to replicate the same pattern and/or placing order of any layer below it. Alternatively, using different patterns for each layer can enhance weight distribution and pallet stability. For example, alternating box patterns between layers creates an interlocking effect.
Note
When adding multiple layers with different patterns, the layer below the current is shown with increased transparency.
4. Motion Subpage
The Motion subpage allows you to configure detailed parameters for how the robot should move the boxes. This page offers various options for fine-tuning the pick and place operations, thus ensuring accurate and efficient motion planning. The parameters are grouped into the following sections:
Pick Offset: Adjusts the pick point on the box. This is necessary when boxes on the conveyor end up slightly misaligned, ensuring the robot can pick them accurately.
Place Offset: Adjusts the place point on the pallet. When boxes are slightly compressed or larger than expected in a specific dimension, place offsets help ensure they are positioned correctly on the pallet.
Layer Offset: Ensures consistent height and proper stacking. Different layers might need slight adjustments to maintain consistent height and proper stacking, especially when handling slightly varying box sizes (due to compression or large content volume).
Place Approach: Defining the place linear approach distance and angle is useful for preventing collisions in the pick-to-place motion. Non-linear approach motions can sometimes lead to collisions with nearby boxes or other objects in the scene (such as the robot base or cell frame).
Place Retraction: Similar to place approach parameters, setting the linear place retraction distance aids in preventing collisions during retraction. A linear upwards motion ensures the robot safely retracts without colliding with nearby boxes.
Clamp Offsets: Fine-tunes the clamp’s motion during picking. Adjusting clamp offsets ensures a secure grip on the box, accommodating any variations in box size or placement on the conveyor.
Pick Retraction: Setting linear pick retraction distances and speeds helps the robot lift boxes smoothly and with no collisions with the conveyor.
Speed: Speed adjustments help optimize the overall palletizing process, ensuring motions are fast yet precise. Finding the optimal fastest speed within safety boundaries is an iterative process, and these parameters help fine-tune the speed during this process.
The Motion subpage also includes an option to overwrite trajectories from the previous motion plan (by clicking the “Overwrite” button). This feature is helpful when specific trajectories require unique motion parameters. For example, the approach vector may need to be adjusted for trajectories where boxes on the pallet obstruct the original path.
Click on the “Calculate” button to plan all the trajectories in the setup.
5. Check Subpage
Use the Check subpage to review and verify the setup and motion plans for the palletizing process.
You can enter the name of the setup and the operator’s name in the provided fields for record-keeping. You can also add any relevant notes pertaining to the particular setup.
The subpage features a Studio visualization of the palletizing robot in action. This interactive visualization allows for a final visual inspection to ensure everything is in place. You can click and drag to rotate the view, and use playback controls to simulate the motion at a faster speed and skip between pallets. A visualization of a 2-layer 6x4 box pattern for the example cell is shown below at 8x speed.
Performance metrics displayed on this subpage include estimated picks per hour (which indicates the efficiency of the setup) and the total motion times for all pallets. The number of boxes per pallet is also shown.
From this page, you can download two types of files: a Setup file and a Motions file. The Setup file is a .json file that contains information on box placements and motion parameters. The Motions file is a .zip file containing trajectory information. Setup files can be uploaded on the Box subpage, while Motions files can be uploaded on the Check page, allowing you to easily import data into other projects.
Click the “Save” button to save the motions in the setup. This action finalizes the setup, allowing it to be activated by clicking the “Activate” button in the Setup homepage. Activating a setup loads it for running trajectories in the physical robot on the Dashboard page, which is detailed in the next section of this guide.
Note
Motions for a setup can only be saved when no planning errors occur.
Refer to the Troubleshooting section for common planning errors and their solutions.